Gowning procedures are vital to cleanroom compliance, and a poorly designed gowning room can make following protocol challenging. Several factors contribute to the layout and furnishing of a functional gowning space, most notably the cleanroom’s application and your budget. Below, we breakdown of each area within and surrounding an “ideal” gowning room.
Pre-Gowning Area
The pre-gowning area is located directly outside of the gowning room. Personnel should be provided with a locker to store any personal items, such as clothing, jewelry, and cell phones, before entering the gowning room.
A motorized shoe cleaner and automatic contamination-control mat remove contaminating 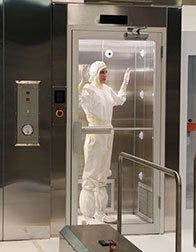 particles and deeply clean seams or welts on your street shoes. Brushes dislodge particles that are then vacuumed up through a HEPA filter, and sticky surfaces catch stubborn contaminants on shoe soles.
Automatic shoe cover dispensers can be positioned so that workers exiting the shoe brush machine cover their freshly cleaned shoes immediately.
Before entering the gowning room, personnel should pass through a HEPA filtered air shower/tunnel to remove particles deposited on clothing. Electromagnetic interlocking doors built into the air shower or tunnel reduce contaminating inflow of air between your classified space and the unclassified outside room.
Sterile “Dirty” Side
A sanitary room with laminar airflow promotes optimal cleanliness during the garbing process. The gowning room pressure should be greater (and the air cleaner) than the outside air, but lower than the air pressure in the cleanroom. This cascading pressure differential reduces the opportunity for contaminants to enter each controlled space. A continuous wash of clean, HEPA-filtered air will help with particle removal from workers, laundered garments, and any equipment entering the cleanroom.
You’ve officially entered the “sterile” gowning room; however, you’re still in street clothing with the potential to adulterate your clean space. Therefore, areas should be designated for pre- and post-gowning. Establishing a clearly divided room decreases the risk of non-garbed personnel accidently wandering into, and polluting, the “clean” side.
 A no-touch operation hand washing station and HEPA- or ULPA-filtered hand dryer should be placed so that personnel exiting the air shower can clean their bare hands before donning glove liners or under gloves.
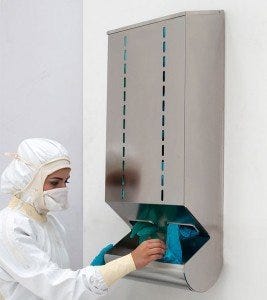
Glove dispensers made from application-specific materials, such as a BioSafe® electropolished stainless steel or chemical-resistant polypropylene, should be located directly after the washing station. If gloves are not clean, a second glove washing and drying station may be advisable; however, this solely depends on your required levels of cleanliness.
Now that your hands are clean and covered, the garmenting process can begin. As a general rule, the best results come from working top to bottom. Therefore, the next area should consist of headwear and face mask dispensers. Also, be sure to provide waste receptacles at any point where packaging is removed during gowning. Disposal bins with food pedals promote cleanliness by reducing contact with contaminated surfaces.
Based on your cleanroom specifications and garment types (reusable, disposable or application-specific), you can decide which garment storage is the best choice. Terra 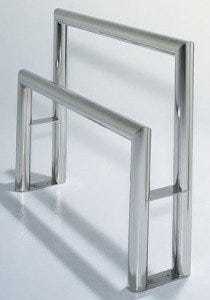 offers open racks for hanging garments, enclosed cabinets with HEPA filtration, or slotted storage shelves that don’t interfere with laminar air flow. Don’t forget your waste receptacle!
You’re almost ready to move over to the “clean” side. To properly don garments, personnel should be provided with ergonomic lean rails or gowning benches and a demarcated gowning platform. The lean rail/benches help workers balance themselves while stepping into coveralls and the platform serves as a non-contaminated surface to help prevent violating garments while dressing.
After head-to-toe gowning, booties will complete the “dirty” side procedures. A bootie/shoe cover dispenser should be placed near the gowning benches that separate the sterile areas.
Sterile “Clean” Side
As each bootie is pulled on, you move into the sterile “clean” side of your gowning room. You’re almost there!
A cleanroom mirror will allow personnel to self-inspect the finished product of their gowning activities. It’s recommended that a poster displaying a properly garbed model be placed next to the mirror as a reference. Mirrors can be flush-mounted on the wall or free-standing, dual-sided floor models, allowing more than one worker to self-check.
Overglove and safety glass dispensers are the final step before entering the second air shower separating the gowning room from your clean, controlled environment.
Cleanroom Exit
After you complete your process tasks, it’s time to exit the cleanroom. To maintain cleanliness, the steps you 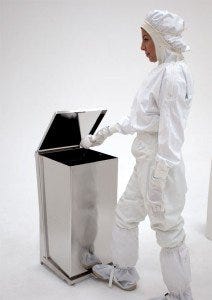 take to de-gown are just as important as preparing for entry. In order to reduce the risk of bringing contaminants out of the critical zone, best practices dictate that workers remove garments from the bottom up. Therefore, start with your shoes.
An automatic shoe cover remover with self-contained disposable bags reduces contamination by providing staff with a hands-free method of removing footwear covers.
Next to come off are coveralls (aka bunnysuits). Depending upon the garment type, a hamper or waste receptacle is essential to efficiently separate laundry from trash; reusable garments will be held in the hamper until they are laundered, while disposable garments will be properly, and safely, thrown away.
Use your waste bins to collect gloves and face masks. In some facilities, safety glasses are recycled, so dispensers made of electropolished stainless steel or cleanroom-compatible plastics act as collection stations. These items are sterilized and returned to supply cabinets.
Location
One last item to consider is how your gowning room will be built. Proper gowning room designs not only rely upon the intended use of the clean room or its budget, but also on the physical location and amount of available space. The gowning room can be placed either inside the clean room area, or directly outside the controlled zone. Also, don’t forget to consider door openings, ceiling height, utility hook-ups, and space-inhibiting equipment when designing your own ideal gowning room!
Click here for more information on Gowning Equipment and Supplies


